BLOG
Precision in Point Clouds: A Fresh Take on LiDAR Annotation

Understanding Point Cloud Labeling
Precision in Point Clouds LiDAR sensors emit laser pulses and record their reflections, they generate a point cloud—a dense set of 3D datapoints that map the surfaces in a scene. But raw point cloud data is just a jumble without context. The task of point cloud labeling, whether for 3D data annotation or sensor fusion annotation, gives structure: each point is associated with a semantic label such as “car,” “pedestrian,” or “building.” This structured data is vital for perception models used in self-driving cars, aerial mapping drones, and virtual reality systems.
Semantic segmentation tags every point in the scene according to its category. In contrast, instance segmentation and bounding box annotation focus on isolated objects—helping algorithms distinguish one pedestrian from another, for example. These sophisticated labeling techniques are the building blocks for object detection, collision avoidance systems, and scene understanding.

The Annotation Pipeline: From Raw Data to Model-Ready Output
Successfully generating high-quality labeled data requires a well-planned annotation pipeline. It usually begins with cleaning and normalizing the raw LiDAR data: removing noise, aligning multiple sensor inputs, and preparing the dataset for human annotators.
Once preprocessed, annotators use annotation tools—ranging from open-source platforms to commercial labeling platforms equipped for 3D data. The process typically unfolds like this:
- Data Ingestion
Annotators import sensor fusion data, which often includes synchronized camera views and GPS metadata to assist accurate labeling of objects in 3D space. - Labeling & Classification
Each object is drawn with precise bounding box annotation or segmented point-by-point. Descriptive labels may include “truck,” “bicycle,” or “traffic cone,” depending on the annotation taxonomy. - Review & Quality Control
To ensure consistency, annotation workflows incorporate cross-review, where one labeler reviews another’s work. Automated quality control measures—like overlap detection or minimum object size checks—help flag anomalies. - Export & Integration
Final annotations are bundled in formats compatible with machine learning pipelines. Commonly used outputs include JSON or XML label files, along with visualization-friendly formats like PLY or LAS.
Key Challenges in 3D Annotation Workflows
Despite advances in annotation technologies, several challenges persist:
- Occlusions and Sparse Data
LiDAR sensors can only “see” what’s within their line of sight. As a result, parts of objects may be missing. This makes drawing accurate bounding boxes or segmentation surfaces difficult, especially for partially obscured pedestrians or vehicles. - Annotation Consistency
When multiple labelers work on the same dataset, discrepancies can arise in how aggressively they define object boundaries. A strong labeling platform with inter-annotator agreement scoring helps maintain uniformity. - Sensor Calibration and Alignment
Combining camera footage with point clouds requires accurate calibration. Misalignment can lead to skewed labels and degrade perception models that rely on sensor fusion annotation.
Balancing Speed and Accuracy: Tools & Automation
The rise of specialized labeling software has ushered in powerful features like AI-assisted labeling and pre-annotation—where preliminary labels are generated by machine learning models and refined by human annotators. Active learning pipelines also leverage uncertainty metrics, flagging only the most ambiguous scenes for manual review to optimize annotation efficiency.
When choosing a tool, consider the following capabilities:
- 3D Annotation Support: Systems that allow seamless point cloud navigation, rotation, and zoom.
- AI-Assisted Labeling: Automated semantic segmentation features or pre-made bounding boxes that reduce manual workload.
- Quality Control Modules: Built-in checks for annotation overlap, threshold sizes, and coverage.
- Collaborative Features: Multi-user management, task assignment, and performance tracking.
- Export Compatibility: Output in annotation schema formats such as COCO or KITTI.
Cost and Timeline Considerations for LiDAR Labeling Projects
Annotating point clouds is inherently more resource-intensive than 2D image labeling. The time required for a single 10-second LiDAR snippet can range between 15 and 45 minutes, depending on scene complexity. Likewise, pricing may vary from $10 to $50 per frame in B2B annotation marketplaces. Key factors include:
- Level of Detail: Does your project use simple bounding boxes or full instance segmentation?
- Scene Complexity: Dense urban environments require more effort than clear, open-road capture.
- Annotation Standards: Projects demanding consistency across teams or requiring multi-pass review increase labor and cost.
- Automation Investment: While AI-assisted annotation requires upfront integration effort, it greatly reduces per-label time and overall labeling costs in the long run.
Best Practices for High-Quality Annotation
To get the most from your LiDAR annotation efforts, follow these expert tips:
- Dynamic Annotation Guidelines
Create evolving rulebooks with edge-case examples to guide labelers. For instance, define how much of a pedestrian must be visible before a label is applied. - Regular Calibration Checks
Trends in sensor drift or misalignment often go unnoticed until batch annotation is complete. Regular recalibration prevents systemic errors. - Annotator Training & Feedback
Regular training sessions ensure consistent label understanding. Performance metrics tied to key annotation categories help highlight where refinements are needed. - Iterative QA Cycles
Early in the project, spot-check batches at short intervals. As the annotation proceeds, introduce cross-review panels or consensus labeling where labelers resolve ambiguous cases collaboratively. - Leverage Pre‑Annotation Tools
Use neural network models to pre-label scenes. Human annotators then focus on adjusting and verifying labels instead of drawing them from scratch.
Navigating Trends in Automated Annotation
The LiDAR annotation landscape is shifting. Leading-edge teams are experimenting with these developments:
- Active Learning Pipelines
When a model cannot make confident predictions, those scenes are flagged for human review—ensuring efficient use of labeling resources. - Semi-supervised and Synthetic Data Training
By combining labeled real-world scans with synthetic, labeled simulations, training datasets grow while reducing manual annotation overhead. - Cross‑modal Pre‑annotation
Advances in sensor fusion enable automatic cross-labeling, where 3D annotations automatically link to 2D camera imagery, aiding more robust perception across modalities.
Choosing the Right Labeling Platform
When comparing annotation tools, evaluate based on:
- Scalability: Can the tool handle large data volumes with fast rendering?
- AI Integration: Does it offer pre-annotation, active learning, or batch automation?
- Collaboration Features: Look for role-based access, task tracking, review history, and user analytics.
- API Support & Export Formats: Ensure compatibility with your ML pipeline and toolkit—whether TensorFlow, PyTorch, or ROS.
Frequently Asked Questions (FAQs)
Q: What is the difference between semantic segmentation and instance segmentation in 3D annotation?
- Semantic segmentation assigns a class (e.g., “car”) to every point in the point cloud. Instance segmentation additionally differentiates individual object instances—recognizing “Car #1” vs. “Car #2” even if they belong to the same class.
Q: How do annotation teams control label quality?
- Through multi-review systems where each frame is checked by multiple annotators, and automated quality control systems that detect annotation inconsistencies or object size errors before export.
Q: What types of tools support point cloud labeling?
- Tools range from open-source frameworks like CVAT and Label3D to proprietary platforms built for industrial-scale datasets, which often include collaborative workflows and active-learning integration.
Q: Can annotation be automated?
- Yes—AI-assisted pre-annotation generates initial labels using trained models. Combined with human validation, it can dramatically speed up annotation and reduce costs.
Q: How do sensor fusion and metadata assist annotation?
- Synchronizing camera imagery with 3D data lets annotators visually verify object labels. In addition, GPS and IMU metadata aid in scene alignment and consistency across frames.
Conclusion
High-quality point cloud labeling stands at the intersection of technology, human expertise, and process rigor. Equipped with the right annotation tool, a smart pipeline, and a multi-layered quality control strategy, teams can generate richly labeled datasets that power next-generation perception

Explain PAN The word “PAN” can mean different things depending on the context. In technology, it’s short for Personal Area Network—a type of wireless network that connects devices within a small area, like your phone, smartwatch, and earbuds. In language, “pan” is a prefix meaning “all” or “every,” as in “pan-Latin” or “pan-European.” And in everyday speech, you might hear “pan” as a synonym for “broad” or “comprehensive.”
Why does this matter? Because understanding PAN helps you navigate everything from setting up your smart home to decoding new words in English, Spanish, or even Latin.
Explain PAN in Networking: What Is a Personal Area Network?
Let’s start with the tech side. In networking, PAN stands for Personal Area Network. It’s the smallest type of computer network, designed to connect devices within a few meters of each other—think of your Bluetooth headphones, fitness tracker, and smartphone all talking to each other.
Wireless Area Network Definition vs. PAN
A wireless area network definition usually refers to any network that uses wireless technology to connect devices. This includes:
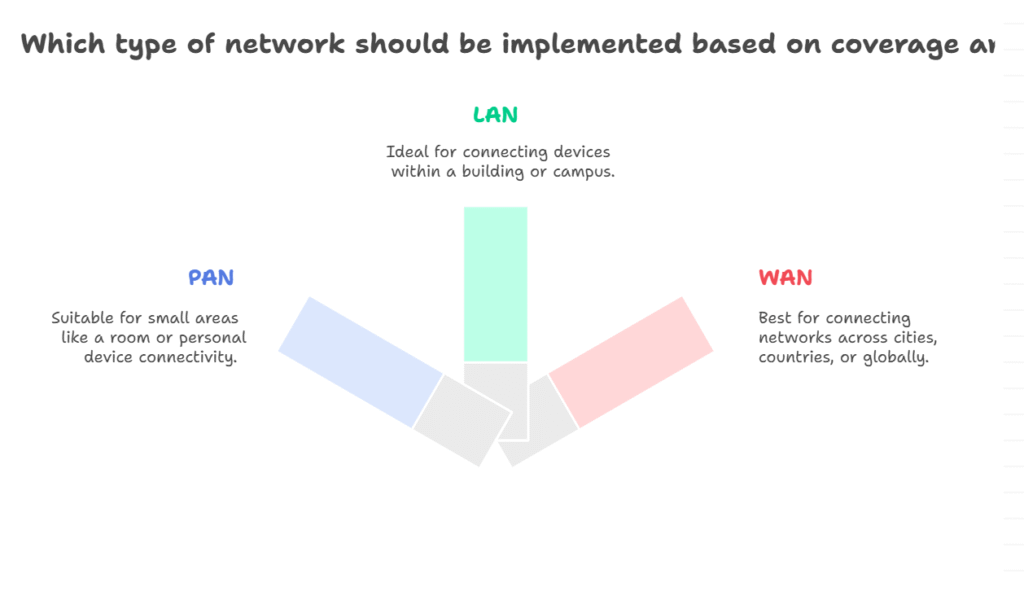
- PAN (Personal Area Network): Covers a few meters (e.g., Bluetooth, Zigbee)
- LAN (Local Area Network): Covers a building or campus (e.g., Wi-Fi)
- WAN (Wide Area Network): Covers cities, countries, or the globe (e.g., the internet)
So, a wireless personal area network is a PAN that uses wireless tech—most commonly Bluetooth.
Real-World Example: PAN in Everyday Life
A user recently shared,
“I love how my smartwatch, phone, and wireless earbuds all sync automatically. I didn’t realize that’s a PAN in action—my own little network!”
This is the magic of PAN: seamless, invisible connections that make your digital life easier.
PAN Synonym: Other Words for PAN
If you’re looking for a PAN synonym, you might use:
- Network (in tech)
- All-encompassing or universal (in language)
- Comprehensive or broad (in general use)
The meaning depends on the context, but PAN always suggests something that covers a wide scope or brings things together.
Prefix Pan: The Power of “All”
In language, the prefix pan comes from the Greek word for “all” or “every.” You’ll see it in words like:
- Pan-Latin: Relating to all Latin-speaking peoples or cultures
- Pan-European: Involving all of Europe
- Panorama: A view of everything in all directions
Understanding the prefix pan helps you decode new words and spot connections across languages.
Wireless Personal Area Network: How Does It Work?
A wireless personal area network (WPAN) is a PAN that uses wireless tech to connect devices. The most common WPAN technologies in 2025 are:
- Bluetooth: For headphones, wearables, and smart home devices
- Zigbee: For smart lights, sensors, and home automation
- Infrared: For remote controls (less common now)
WPANs are designed for convenience, low power use, and short-range communication—perfect for your personal gadgets.
PAN Latin: The Cultural and Linguistic Side
The phrase pan Latin (or pan-Latin) is used to describe anything that spans all Latin cultures or languages. In music, you might hear about a “pan-Latin festival” featuring artists from across Latin America. In linguistics, pan-Latin refers to words, roots, or traditions shared by all Latin-based languages.
PAN in Technology: More Than Just Bluetooth
While Bluetooth is the most famous PAN technology, there are others:
- Near Field Communication (NFC): Used for contactless payments and quick device pairing
- Ultra-Wideband (UWB): For precise location tracking and secure device connections
- Wi-Fi Direct: Allows devices to connect directly without a router
In 2025, PANs are everywhere—from your car’s infotainment system to your smart glasses.
PAN vs. LAN vs. WAN: What’s the Difference?
| Network Type | Full Name | Range | Example Use Case |
|---|---|---|---|
| PAN | Personal Area Network | 1–10 meters | Phone to smartwatch |
| LAN | Local Area Network | 10–100 meters | Home or office Wi-Fi |
| WAN | Wide Area Network | Global | The internet, corporate VPN |
The Pros and Cons of PANs
Pros
- Convenience: Connects your devices automatically
- Low power: Designed for battery-powered gadgets
- Privacy: Short range reduces risk of hacking
Cons
- Limited range: Only works within a few meters
- Interference: Can be disrupted by other wireless signals
- Security: Bluetooth and other PANs can be vulnerable if not secured
How to Set Up a Wireless Personal Area Network
- Turn on Bluetooth or other PAN tech on your devices.
- Pair devices (e.g., phone and earbuds).
- Set permissions for sharing data or notifications.
- Enjoy seamless connectivity—your devices will remember each other!
PAN in 2025: Trends and Innovations
- Smart homes: PANs connect everything from lights to locks.
- Wearables: Fitness trackers, smart rings, and AR glasses use PANs for data sync.
- Healthcare: Medical devices use PANs for real-time monitoring.
- Automotive: Cars use PANs to connect phones, keys, and entertainment systems.
PAN Synonym in Tech: WPAN, Bluetooth Network, Device Mesh
In tech circles, you might hear PAN called a WPAN (wireless personal area network), Bluetooth network, or even a device mesh when multiple gadgets connect together.
Prefix Pan in Modern Language
The prefix pan is everywhere in 2025:
- Pan-African: Relating to all African countries or cultures
- Pan-Asian: Involving all of Asia
- Pandemic: Affecting all people (as we learned in recent years)
It’s a powerful prefix that signals inclusivity and breadth.
Real-World Example: PAN Security Risks
A tech blogger wrote,
“I left my Bluetooth on in a coffee shop and someone tried to connect to my phone. Now I always turn off PAN features when I’m not using them.”
This is a reminder: while PANs are convenient, always use security features like pairing codes and device whitelists.
FAQs
Q. What is a wireless area network definition?
A. wireless area network is any network that uses wireless technology to connect devices. This includes PANs (personal), LANs (local), and WANs (wide).
Q. What is a PAN synonym in networking?
A. In networking, PAN is often called a WPAN (wireless personal area network) or Bluetooth network.
Q. What does the prefix pan mean?
A. The prefix pan means “all” or “every,” as in pan-Latin (all Latin cultures) or pandemic (affecting all people).
Q. How does a wireless personal area network work?
A. wireless personal area network connects devices within a few meters using Bluetooth, Zigbee, or similar tech. It’s used for syncing gadgets, sharing files, and more.
PAN Latin: Why It Matters in Culture and Language
Understanding pan Latin helps you appreciate the shared roots and connections across Spanish, Portuguese, French, Italian, and other Latin-based languages. It’s also a reminder of the power of unity in music, art, and global events.
PAN in Pop Culture and Everyday Life
From “pansexual” (attracted to all genders) to “panorama” (a view of everything), the prefix pan is everywhere. It’s a word that signals openness, inclusivity, and connection—values that matter more than ever in 2025.
Risks and Best Practices for Using PANs
- Always pair devices in private, secure locations.
- Turn off Bluetooth or other PAN features when not in use.
- Update device firmware to patch security holes.
- Be cautious with public device sharing.
Final Thoughts
Whether you’re a tech enthusiast, a language lover, or just someone who wants to make sense of modern life, knowing how to explain PAN is a valuable skill. From wireless personal area networks to the prefix pan in language, it’s a concept that connects technology, culture, and communication.

Have you ever wondered how AI-generated images are getting so realistic, creative, and downright mind-blowing? The world of imagen examples is exploding in 2025, with new models and tools making it easier than ever to turn your imagination into vivid, shareable visuals. Whether you’re a digital artist, a marketer, or just someone who loves exploring the latest tech, understanding imagen examples can open up a world of creative possibilities.
But what exactly are imagen examples, and how do they work? Let’s dive into the fascinating universe of AI image generation, explore the latest tools, and see real-world results that are changing the way we think about art, design, and even relaxation.

What Are Imagen Examples? A Quick Overview
At its core, imagen examples refer to the images produced by advanced AI models—like Google’s Imagen, ImagenAI, and other next-gen generators. These tools use deep learning to transform text prompts into detailed, high-resolution images. The results? Sometimes whimsical, sometimes photorealistic, and always impressive.
You might have seen images being generated by legacy model systems in the past, but today’s imagen family of tools takes things to a whole new level. The difference is night and day.
The Evolution of the Imagen Family
The imagen family of AI models has grown rapidly since its debut. Early versions focused on simple, cartoonish outputs. Now, with ImagenAI and its siblings, you can create everything from hyper-realistic portraits to abstract art and even “anarchy image example” outputs that break all the rules.
Key Milestones in the Imagen Family
- Legacy models: Basic, low-res images with limited detail.
- ImagenAI: High-res, nuanced, and capable of understanding complex prompts.
- AI relaxation emagine generator: Specialized for calming, meditative visuals.
The evolution of the imagen family means more options, better quality, and endless creative potential.
Real-World Imagen Examples: From Art to Anarchy
Let’s look at some real-world imagen examples that showcase the power and versatility of these tools.
Artistic Creations
Artists are using ImagenAI to generate concept art, storyboards, and even finished pieces. One user shared, “I used ImagenAI to create a fantasy landscape for my novel. The results were so good, I printed them as posters!”
Marketing and Branding
Marketers are leveraging imagen examples to create unique visuals for campaigns, social media, and product launches. The ability to generate custom images on demand is a game-changer.
Anarchy Image Example
Some users push the boundaries with “anarchy image example” prompts, resulting in wild, unexpected, and sometimes controversial art. These examples highlight both the creative freedom and the ethical questions that come with AI image generation.
Images Being Generated by Legacy Model vs. Modern ImagenAI
If you’ve seen images being generated by legacy model systems, you know they often looked blurry or generic. Modern ImagenAI, on the other hand, produces images that are sharp, detailed, and full of personality.
Side-by-Side Comparison
- Legacy Model: Simple shapes, limited color palette, low resolution.
- ImagenAI: Realistic textures, dynamic lighting, and the ability to interpret complex prompts.
The leap in quality is obvious—and it’s why so many creators are making the switch.
AI Relaxation Emagine Generator: A New Way to Unwind
One of the most exciting developments in 2025 is the AI relaxation emagine generator. This tool uses AI to create soothing, meditative visuals based on your mood or preferences.
Imagine coming home after a long day, typing “peaceful forest at sunset,” and instantly getting a calming image to help you relax. It’s not just art—it’s self-care.
User quote:
“I use the AI relaxation emagine generator every night before bed. The images help me unwind and clear my mind.”
How ImagenAI is Changing Creative Workflows
The rise of imagenai is transforming how artists, designers, and even hobbyists approach their work. No more staring at a blank canvas—just type your idea and let the AI do the heavy lifting.
Benefits of Using ImagenAI
- Speed: Generate dozens of concepts in minutes.
- Inspiration: Get fresh ideas you might never have considered.
- Customization: Tweak prompts until you get the perfect result.
But it’s not just about speed. ImagenAI is also making creative work more accessible to people who might not have traditional art skills.
Risks and Ethical Considerations
With great power comes great responsibility. The ability to generate any image raises questions about copyright, deepfakes, and the potential misuse of AI.
Key Risks
- Plagiarism: Some imagen examples may unintentionally mimic existing art.
- Misinformation: AI-generated images can be used to create fake news or misleading content.
- Bias: AI models can reflect and amplify societal biases.
It’s important to use these tools thoughtfully and stay informed about best practices.
Pros and Cons of Using Imagen Examples in 2025
Pros
- Unlimited creativity: Generate anything you can imagine.
- Time-saving: Rapid prototyping and ideation.
- Accessibility: No need for advanced art skills.
Cons
- Quality control: Not every image will be perfect.
- Ethical concerns: Potential for misuse.
- Learning curve: Crafting the right prompt takes practice.
FAQs
1. What are imagen examples and how are they created?
Imagen examples are images generated by AI models like ImagenAI. You provide a text prompt, and the AI creates a visual interpretation.
2. How does the imagen family differ from other AI image generators?
The imagen family is known for high-resolution, detailed outputs and advanced understanding of complex prompts.
3. Can I use imagen examples for commercial projects?
Yes, but check the licensing terms of the specific AI tool you’re using to ensure compliance.
4. What is an anarchy image example?
An anarchy image example refers to images generated with prompts that intentionally break rules or create chaotic, unexpected results.
Final Thoughts
The world of imagen examples is only getting bigger and more exciting. With tools like ImagenAI, AI relaxation emagine generator, and the ever-expanding imagen family, anyone can become a creator. Whether you’re making art, marketing materials, or just exploring your imagination, the possibilities are endless.

Unbeatable Value You might be wondering: why focus on the 2023 SUV when newer models like the Chevy Equinox 2025 and 2024 GMC Terrain are already making headlines? The answer is simple—2023 SUVs offer a sweet spot of value, reliability, and modern features without the premium price tag of brand-new releases. Many 2023 models are now available as certified pre-owned vehicles, making them an attractive option for savvy buyers.
The Evolution of the SUV: What Makes the 2023 SUV Stand Out?
SUVs have come a long way from their boxy, gas-guzzling roots. The 2023 SUV lineup is a testament to this evolution, blending style, technology, and efficiency. Whether you’re eyeing a Chevy SUV or a luxury Infiniti QX60 for sale, you’ll find that 2023 models offer advanced safety features, hybrid options, and connectivity that rivals even the latest releases.
Chevy SUV Models: A Closer Look Unbeatable Value
Why Chevy SUVs Remain a Top Choice
Chevy SUV models have consistently ranked among the best-selling vehicles in the U.S. The 2023 lineup includes favorites like the Chevy Equinox, Traverse, and Tahoe. Each model caters to different needs, from compact city driving to full-size family adventures.
Chevy Equinox 2023 vs. Chevy Equinox 2025
While the Chevy Equinox 2025 brings some exciting updates, the 2023 version remains a solid choice for those seeking value. The 2023 Equinox offers a comfortable ride, user-friendly infotainment, and impressive fuel economy. Plus, with many 2023 models now available at lower prices, it’s a smart buy for budget-conscious shoppers.
Real-Life Experience: Chevy SUV Owner
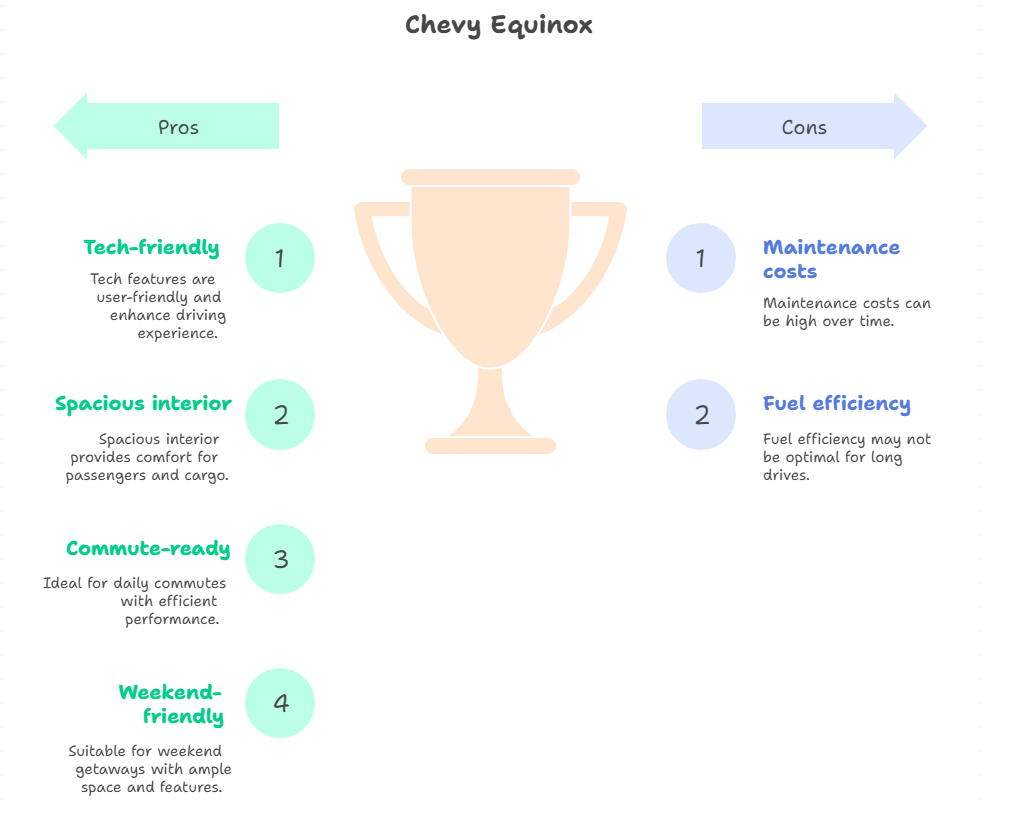
One Chevy Equinox owner shared, “I bought my 2023 Equinox last year, and it’s been perfect for my daily commute and weekend getaways. The tech features are easy to use, and I love the spacious interior.”
Infiniti QX60 for Sale: Is Luxury Worth It?
If you’re considering an Infiniti QX60 for sale, you’re likely drawn to its upscale design and premium features. The 2023 QX60 stands out with its elegant interior, advanced driver-assist systems, and smooth V6 engine. It’s a great option for families who want a touch of luxury without sacrificing practicality.
Infiniti QX60 vs. Chevy SUV Models
While Chevy SUVs are known for their reliability and value, the Infiniti QX60 offers a more refined experience. Think quilted leather seats, a panoramic sunroof, and a quiet cabin. However, maintenance and repair costs can be higher, so it’s important to weigh the pros and cons.
2024 GMC Terrain: How Does It Compare to the 2023 SUV?
The 2024 GMC Terrain is one of the most anticipated compact SUVs, but how does it stack up against 2023 models? The 2023 Terrain already offered a comfortable ride, intuitive tech, and a stylish exterior. The 2024 version adds a few tech upgrades and a refreshed look, but if you’re looking for value, the 2023 Terrain is still a strong contender.
What to Look for in a 2023 SUV
Safety Features
Modern SUVs are packed with safety tech. Look for features like automatic emergency braking, lane-keeping assist, blind-spot monitoring, and adaptive cruise control. Many 2023 SUVs, including Chevy SUV models and the Infiniti QX60, come standard with these systems.
Fuel Efficiency
With gas prices fluctuating, fuel economy is more important than ever. The 2023 SUV market includes several hybrid and plug-in hybrid options, as well as efficient gas engines.
Interior Comfort and Space
Whether you’re hauling kids, pets, or gear, interior space matters. Test the rear seat legroom, cargo capacity, and overall comfort. The 2023 Chevy Equinox and Infiniti QX60 both score high in this area.
Technology and Connectivity
From wireless Apple CarPlay to advanced navigation, tech features can make or break your driving experience. The 2023 SUV segment is loaded with user-friendly infotainment systems, smartphone integration, and even Wi-Fi hotspots.
Popular 2023 SUV Models: A Quick Overview
Chevy Equinox
- Engine: 1.5L turbocharged
- MPG: Up to 31 highway
- Seating: 5
- Highlights: Spacious, affordable, great tech
Infiniti QX60
- Engine: 3.5L V6
- MPG: Up to 26 highway
- Seating: 7
- Highlights: Luxury interior, advanced safety, smooth ride
GMC Terrain
- Engine: 1.5L turbocharged
- MPG: Up to 30 highway
- Seating: 5
- Highlights: Stylish, comfortable, good value
Toyota RAV4
- Engine: 2.5L 4-cylinder (hybrid available)
- MPG: Up to 41 city (hybrid)
- Seating: 5
- Highlights: Reliable, efficient, strong resale value
Honda CR-V
- Engine: 1.5L turbocharged (hybrid available)
- MPG: Up to 40 city (hybrid)
- Seating: 5
- Highlights: Spacious, efficient, family-friendly
Used 2023 SUVs: The Smart Shopper’s Choice
Buying a used or certified pre-owned 2023 SUV can save you thousands while still delivering modern features and reliability. Many dealers now offer extended warranties and thorough inspections, giving you peace of mind.
Chevy SUV Models: Which One Fits Your Lifestyle?
Compact: Chevy Trax and Equinox
Perfect for city dwellers and small families, these models are easy to park and fuel-efficient.
Midsize: Chevy Blazer and Traverse
Need more space? The Blazer and Traverse offer roomy interiors and strong performance for road trips or carpools.
Full-Size: Chevy Tahoe and Suburban
For those who need maximum space and towing power, the Tahoe and Suburban are hard to beat.
The Rise of Hybrid and Electric SUVs
The 2023 SUV market saw a surge in hybrid and electric options. Models like the Toyota RAV4 Hybrid and Ford Escape Hybrid offer impressive fuel savings and lower emissions. Chevy is also investing in electrification, with the Equinox EV on the horizon.
Real-World Example: Family Road Trip in a 2023 SUV
A family of five recently shared their experience taking a cross-country trip in their 2023 Chevy Traverse. “We had plenty of room for everyone and all our luggage. The kids loved the rear-seat entertainment, and we felt safe with all the driver-assist features. It made our vacation stress-free.”
2023 SUV vs. 2024 and 2025 Models: Is Newer Always Better?
While the latest models like the Chevy Equinox 2025 and 2024 GMC Terrain offer incremental improvements, the 2023 SUV lineup still holds its own. You’ll often find better deals, lower insurance rates, and a wider selection of certified pre-owned vehicles.
Pros and Cons of Buying a 2023 SUV in 2025
Pros
- Lower Price: Depreciation works in your favor.
- Proven Reliability: Any recalls or issues are usually resolved.
- Modern Features: Most 2023 SUVs have up-to-date tech and safety.
Cons
- Fewer Customization Options: Limited to what’s available on the used market.
- Potentially Higher Mileage: Depending on previous use.
- Warranty: May have less coverage than a brand-new model.
How to Find the Best 2023 SUV Deals
- Certified Pre-Owned Programs: Look for manufacturer-backed warranties and inspections.
- Compare Prices: Use online tools to check prices at local dealerships.
- Check Vehicle History: Always review the Carfax or similar report.
- Negotiate: Don’t be afraid to ask for extras like free maintenance or lower interest rates.
Chevy Equinox 2025: What’s New and Should You Wait?
The Chevy Equinox 2025 introduces updated styling, more tech features, and improved efficiency. If you want the latest and greatest, it might be worth waiting. But for most buyers, the 2023 Equinox offers nearly all the same benefits at a lower price.
2024 GMC Terrain: Worth the Upgrade?
The 2024 GMC Terrain brings a refreshed look and some new tech, but the core features remain similar to the 2023 model. If you find a great deal on a 2023 Terrain, you’re not missing out on much.
Infiniti QX60 for Sale: Tips for Buying Used Luxury
- Check Service Records: Luxury vehicles require regular maintenance.
- Inspect for Wear: Look for signs of excessive wear on seats and electronics.
- Consider Certified Pre-Owned: Infiniti’s CPO program offers extra peace of mind.
Chevy SUV Models: Reliability and Resale Value
Chevy SUVs are known for their durability and strong resale value. Models like the Equinox and Tahoe consistently rank high in owner satisfaction and reliability surveys.
The Future of SUVs: Trends to Watch in 2025
- Electrification: More hybrid and electric options are coming.
- Advanced Safety: Expect even more driver-assist features.
- Connectivity: 5G and over-the-air updates will become standard.
- Sustainability: Eco-friendly materials and manufacturing processes.
FAQs
1. What are the best 2023 SUV models for families?
The Chevy Traverse, Honda CR-V, and Toyota RAV4 are top picks for families, offering space, safety, and reliability.
2. Is it better to buy a 2023 SUV or wait for a 2025 model?
If you want the latest features, waiting might make sense. But for value and proven reliability, a 2023 SUV is a smart choice.
3. How does the Infiniti QX60 compare to other luxury SUVs?
The Infiniti QX60 offers a luxurious interior and advanced tech at a competitive price, but maintenance costs can be higher than mainstream brands.
4. Are Chevy SUV models reliable?
Yes, Chevy SUVs like the Equinox and Tahoe are known for their reliability and strong resale value.
Final Thoughts
The 2023 SUV market is full of hidden gems, offering modern features, proven reliability, and excellent value. Whether you’re eyeing a Chevy SUV, an Infiniti QX60 for sale, or a certified pre-owned GMC Terrain, there’s a 2023 SUV that fits your needs and budget.
-

 TECH2 months ago
Glow and Type: Exploring Light-Up Computer Keyboards
-

 BUSINESS2 months ago
Bussin’ with the Boys: New Contract, Same Chaos
-

 BUSINESS2 months ago
2025 Toyota Fortuner: The Ultimate Blend of Power and Luxury
-

 BUSINESS2 months ago
Choosing the Perfect Salmon Fishing Pole
-

 BLOG2 months ago
Paws on Canvas: Iconic Cat Paintings Through Time
-

 EDUCATION2 months ago
How Many Teeth Does a Shark Really Have?
-

 ENTERTAINMENT2 months ago
Playing Japanese Games on Dolphin
-

 BUSINESS2 months ago
Shiny Rides for Just $3: Affordable Car Wash Revolution